


How to Set Up a Home Contrast Therapy Station
Quick Summary
To set up a home contrast therapy station, place a heat source and a cold plunge within a few steps of each other with a dry, non-slip landing mat roughly three feet wide between them. Plan around eight feet of clear wall, confirm power, drainage, ventilation and floor loading before buying, then fix a simple heat-and-cold sequence you will repeat.
- A one-person infrared cabin can be as small as 35.5 inches square, fitting a bedroom corner.
- A cold plunge with its chiller needs roughly 75 inches of length once the chiller sits beside the tub.
- Check each unit's electrical draw before plugging a chiller and sauna into the same circuit.
- Skim debris before each session and check the filter and water chemistry weekly.
- A common structure is ten to fifteen minutes of heat, then one to three minutes of cold, for two to four rounds.
Table of Contents
- What a Home Contrast Therapy Station Actually Requires
- Planning Your Home Sauna and Cold Plunge Setup
- Cold Plunge Setup at Home: Choosing and Placing the Tub
- Cold Plunge Water Maintenance Between Sessions
- Building a Contrast Therapy Routine at Home
- Small-Space and Renter-Friendly Configurations
- What the Full Setup Costs and How to Budget
- Choosing Your Contrast Therapy Equipment
- Frequently Asked Questions
- Frequently Asked Questions
Meta Title: How to Set Up a Home Contrast Therapy Station
Meta Description: A practical guide to planning a home contrast therapy station: sauna and cold plunge placement, electrical needs, water care, small-space layouts, and real equipment costs.
Last Updated: October 30, 2026
What a Home Contrast Therapy Station Actually Requires
A home contrast therapy station is a dedicated space where a heat source and a cold source sit close enough to move between in a few steps, with a dry landing spot between. A workable setup comes down to three things: the equipment, the room, and the routine.
The room often decides what can be installed. Electrical capacity, drainage, ventilation, and floor loading all set practical limits.
Heat, Cold, and the Space Between
Contrast bathing is the practice of alternating a heat session with a cold session in a set sequence, repeated for a fixed number of rounds.
The gap between the sauna door and the plunge affects how easily the routine flows. You want a dry, non-slip surface roughly three feet wide, a towel hook within arm's reach, and nothing to trip over.
Here is the layout sequence we recommend:
- Sauna or heat source against a wall with clearance for the door swing
- Cold plunge beside it, with room for the chiller unit and its hoses
- A dry landing mat between them
- A towel and water station at the edge of the mat
- A clock or timer visible from both units
Planning Your Home Sauna and Cold Plunge Setup
Start with the room, not the equipment. A home sauna and cold plunge setup depends on four checks: power, water, air, and floor.
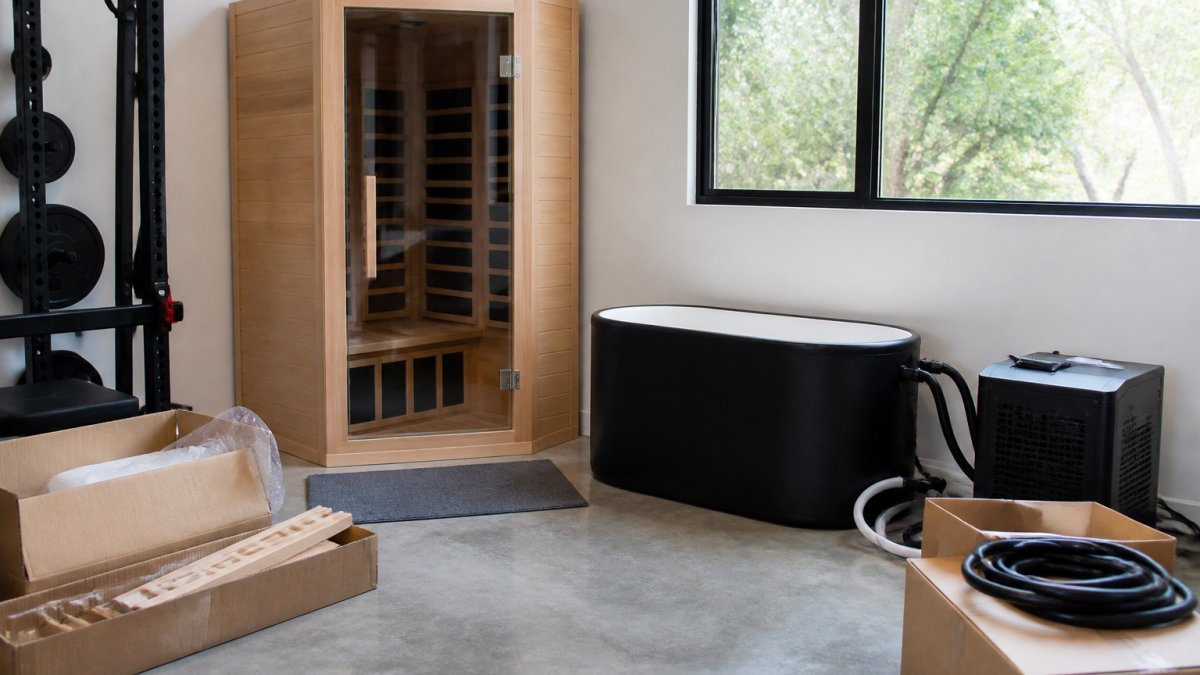
Measure the footprint first. A one-person infrared cabin can run as small as 35.5 inches square, fitting a bedroom corner or spare room. A cold plunge with a chiller needs roughly 75 inches of length once the chiller sits beside the tub.
Electrical, Plumbing, and Ventilation Checks
Power is often the first limit. Some infrared cabins plug into a standard 120 V household outlet with no wiring work; others need a dedicated circuit.
Before you buy anything, do this:
- Find the circuit your chosen wall shares with other outlets
- Confirm the amperage on the breaker
- Check the manufacturer's electrical requirement for each unit
Plumbing is simpler than most people fear. Some cold plunges need no plumbing at all: you fill them with a hose and drain them manually.
Ventilation matters for the heat side.
Watch out: plugging a chiller and a sauna into the same circuit because the outlets are close together can overload it.
Cold Plunge Setup at Home: Choosing and Placing the Tub
Floor loading comes first. The Modtub 2.0 weighs about 850 lb once filled, so confirm your floor can carry it.
Chiller performance comes second. Look for a stated temperature range rather than a vague "cold" claim.
Placement comes third. Keep three things clear:
- The chiller's vents. They need airflow, not a wall pressed against them.
- The hose run. Short, straight runs kink less.
- The step-in side. You want a dry, flat surface to stand on as you get out.
Indoor or outdoor both work. Outdoors needs a level, stable base and a sealing lid.
If you already know where the tub goes, you can compare dimensions and filled weights on each catalog product page.
Cold Plunge Water Maintenance Between Sessions
Clean water is the difference between a plunge you use and a plunge you avoid.
Filtration runs while the pump circulates. Filter micron ratings vary by model, so check the specification for your tub.
Here is the maintenance rhythm that holds up in practice:
| Task | Frequency | What to Check |
|---|---|---|
| Skim visible debris | Before each session | Leaves, hair, film on surface |
| Check filter | Weekly | Debris load, rinse or replace |
| Test water chemistry | Weekly | Sanitizer level, pH balance |
| Full water change | Every few weeks to monthly | Cloudiness, odor, use frequency |
| Clean tub walls | With each water change | Biofilm on the liner |
Two habits extend the interval between changes. Showering before you get in and keeping the lid on when the tub is idle are common ways to limit debris and heat loss.
Watch out: skipping filter checks can lead to cloudy water, and a clogged filter can make the chiller work harder.
If you want a dedicated sanitation setup, an inline filtration and UV system for cold plunges handles filtration and UV treatment in one unit that fits most tubs.
Building a Contrast Therapy Routine at Home
A contrast therapy routine at home works best when the sequence is fixed and the timing is short. Decide your protocol once, write it down, and stop negotiating with yourself in the moment.
1-Person Red Cedar Far Infrared Sauna with Bluetooth →
A simple starting structure:
- Warm up: two to three minutes of comfortable heat to settle in
- Heat session: ten to fifteen minutes at a temperature you find comfortable, not maximum
- Transition: stand on the mat, towel off, breathe
- Cold session: one to three minutes in the plunge
- Repeat: two to four rounds, depending on time
- Cool down: finish on the cold side or on neutral ground, your choice
Three to five minutes per cold immersion is a commonly used duration for some users. Start shorter. Duration is personal preference, and the number that matters is the one you will repeat next week.
A few rules that keep sessions comfortable:
- Drink water before and after your session
- Avoid alcohol before a session
- Skip the session if you feel unwell
If you are still working out how the two halves fit together, plan the sessions around your own weekly schedule.
Small-Space and Renter-Friendly Configurations
Renters and small-space owners can run a full station. The trick is choosing equipment that does not require permanent installation.
Three configurations work in tight footprints:
- The corner stack. A one-person infrared cabin at 35.5 inches square in one corner, with an inflatable plunge tub that packs down into a carry bag when not in use.
- The dual-purpose tub. A single inflatable tub with a chiller that both cools and heats covers the hot and cold sides in one footprint.
- The patio swap. Solid tub outdoors, sauna blanket or compact cabin indoors, with the routine split across two spots.
For renters, prioritize equipment that plugs into a standard outlet and needs no plumbing.
Non-slip matting and a clear walking path matter more in small rooms, not less.
For tubs that suit tighter rooms, compare footprints and filled weights on the product pages.
What the Full Setup Costs and How to Budget
Budget in three layers, not one. The equipment is the visible cost. Power, water care, and running costs are the ones that surprise people.
| Layer | What It Covers | How to Plan |
|---|---|---|
| Equipment | Heat source, cold source, chiller | The largest line; compare specs, not just price |
| Installation | Electrical work, base or pad, matting | Quote before you buy if a circuit is needed |
| Consumables | Filters, water treatment, towels | Small but recurring |
| Running | Electricity for chiller and heater | Estimate from each unit's stated draw |
On equipment, here is where our current catalog sits:
- 1-Person Red Cedar Far Infrared Sauna with Bluetooth: $2,289.00
- 248-Gallon Inflatable Cold Plunge Tub with Hot & Cold: $1,409.00
- Drift Inflatable Cold Plunge with Cooling Unit: $2,309.00
A budget-first station pairs the inflatable hot-and-cold tub with a sauna blanket or compact cabin; a full solid-tub station sits at the top of that range.
Do not buy the cheapest chiller and the most expensive cabin, or the reverse. Mismatched equipment is where most home setups lose their value.
Choosing Your Contrast Therapy Equipment
Match the equipment to the room you have, not the room you want. That single rule prevents most buying regrets.
Work through this decision order:
- Measure the wall run. Eight feet of clear wall covers most one-person setups.
- Confirm the power. Standard outlet or dedicated circuit, per unit.
- Check the floor. Filled weight against the load rating.
- Pick the cold side. Solid tub for permanence, inflatable for flexibility.
- Pick the heat side. Cabin for a dedicated room, blanket for a shared one.
- Confirm the water plan. Filter, sanitizer, drain route.
The sauna and the plunge are best specified together.
This product is intended for general wellness and relaxation. It is not a medical device and is not intended to diagnose, treat, cure, or prevent any disease.
Building a station that actually gets used takes more planning than shopping.
Frequently Asked Questions
How much space do I need for a home contrast therapy station?
Plan for roughly eight feet of clear wall. A one-person infrared cabin can be as small as 35.5 inches square, and a cold plunge with its chiller needs about 75 inches of length once the chiller sits beside the tub. Add a dry landing mat about three feet wide between the two units.
Do I need an electrician to install a sauna and cold plunge?
Not always. Some infrared cabins and some cold plunge chillers run on standard household power with no wiring work. Others need a dedicated circuit. Check the manufacturer's stated electrical requirement for each unit and confirm what else shares that circuit before you commit to a wall.
How often do I need to change the water in a cold plunge?
Most home users change the water every few weeks to monthly, depending on how often the tub is used and how well the filter and sanitizer are maintained. Showering before each session and keeping the lid on between sessions both extend the interval. Change the water sooner if it looks cloudy or smells off.
Can I set up a contrast therapy station in a rental or small room?
Yes. Choose equipment that needs no permanent installation: an inflatable tub with a wheeled chiller that runs on household power, and a compact cabin or sauna blanket for the heat side. An inflatable tub can be drained, deflated, and packed into a carry bag, which makes it practical for a lease.
How long should each round of a hot-cold protocol last?
A common structure is ten to fifteen minutes in the heat at a comfortable temperature, then one to three minutes in the cold, repeated for two to four rounds. Three to five minutes of cold immersion is a frequent target for regular users. Start shorter and build up, since duration is personal preference.
Frequently Asked Questions
What equipment do you need for a home contrast therapy station?
At minimum you need a heat source and a cold source. The heat side is usually a one- or two-person infrared sauna cabin or a sauna blanket. The cold side is a cold plunge tub with a chiller, or a cold bath you fill and chill yourself. Add a water filter and treatment system for the plunge, a floor mat, a towel hook, and a timer. A 1-person far infrared sauna and a chiller-equipped plunge tub are the two anchors of most home contrast therapy stations.
How much space do you need for a sauna and cold plunge?
Measure each unit's outside footprint and add clearance for the door swing and for walking between them. A 1-person cedar sauna can be as small as 35.5 inches square, and a compact plunge tub plus its chiller needs about 75 inches of length. A spare bedroom, garage bay, or covered patio often fits both. Leave enough room to step out of the sauna and into the plunge without crossing a wet, cluttered floor.
Can you set up a cold plunge and sauna in the same room?
Yes, and many home setups do. The sauna needs a standard 120 V outlet and dry indoor air, so keep it away from splashing water and give the room some ventilation. The plunge chiller also runs on household power. Put the tub on a hard, level surface that can carry the filled weight. The Modtub 2.0 weighs about 850 lb filled. A floor drain or a nearby hose connection can make water changes easier.
How do you maintain water quality in a home cold plunge?
Run the filter and treatment system continuously between sessions. Many cold plunges use a filter together with an ozone or UV system while the pump circulates. Rinse the filter on a set schedule, replace it as the maker recommends, and change the water on a regular interval rather than waiting for it to look cloudy. Keep the insulated lid on when the tub is empty of people so debris and sunlight stay out and the chiller runs less.


