


Home Cold Plunge Installation Requirements: Setup Guide
Table of Contents
- Home Cold Plunge Installation Requirements at a Glance
- Choosing the Right Location for Cold Plunge Installation
- Cold Plunge Electrical Requirements: Outlets, GFCI, and Circuit Load
- Cold Plunge Plumbing Requirements: Filling, Draining, and Hose Routing
- Indoor Cold Plunge Installation: Moisture, Ventilation, and Condensation
- Cold Plunge Setup Checklist: From Delivery to First Session
- Cold Plunge Installation Costs, Maintenance Access, and Chiller Care
- Frequently Asked Questions
- Frequently Asked Questions
Last Updated: October 13, 2026
Home Cold Plunge Installation Requirements at a Glance
Home cold plunge installation requirements come down to four things: a level, load-bearing surface, a grounded GFCI outlet, a plan for filling and draining water, and clearance around the chiller for airflow.

This guide from Stack For Wellness walks through each requirement in order. Most people focus on the tub, but the room, floor, power, and water are where installs go sideways.
Choosing the Right Location for Cold Plunge Installation
Location decides everything else. Pick the spot first, then size your power and drainage around it.
Indoor vs Outdoor Placement
Indoor placement gives you weather protection and temperature control. Outdoor placement gives you space and easier drainage.
Consider these trade-offs:
- Indoor: Stable room temperature, but you must manage moisture and ventilation.
- Outdoor: Easier water disposal, but the chiller works harder in heat and sun.
- Garage or spare room: A common middle ground with a solid floor and a door for airflow.
For indoor setups, plan for humidity. For outdoor setups, plan for sun exposure on the chiller.
Floor Load Capacity and Surface Preparation
A filled tub is heavy. The Modtub 2.0, for example, weighs about 850 lb when filled, and that load sits on a small footprint.

Here's how to prepare the surface:
- Confirm the floor is level. A slight slope stresses the chiller and can cause uneven water levels.
- Check the load rating for raised decks and upper floors.
- Choose a solid, waterproof surface where possible.
- Place a mat under the tub to protect flooring and catch drips.
Concrete, tile, and garage floors handle the weight well. Upper-floor wood framing needs a closer look.
Cold Plunge Electrical Requirements: Outlets, GFCI, and Circuit Load
Cold plunge electrical requirements start with one rule: the chiller needs a grounded outlet with GFCI protection. GFCI shuts off power if current leaks, which matters anywhere water and electricity share a room.
Match the outlet to the chiller's draw. The Modtub 2.0 uses a quarter-horsepower chiller, while the Drift Inflatable Cold Plunge runs on a standard 100-120V household outlet with no electrician needed.

What GFCI Actually Does
A standard breaker protects the wiring; a GFCI protects people. It compares current going out on the hot leg to current returning on the neutral leg, and cuts power in a fraction of a second if the two differ. For a cold plunge, that means:
- The outlet serving the chiller should be GFCI-protected, either at the receptacle itself or at the breaker.
- Portable GFCI adapters exist for older outlets, but a permanent GFCI receptacle or breaker is the more reliable option.
- Test the GFCI monthly with its test and reset buttons. A GFCI that will not reset has failed and needs replacement.
Circuit Capacity and Dedicated Circuits
Amps add up. A chiller drawing 11 amps at peak already uses most of a 15A circuit's safe continuous capacity, and a shared circuit with a freezer or space heater will trip under load.
Use this quick check before you plug in:
- Find the chiller's rated amps on its label or in the manual.
- Identify which breaker controls the outlet you plan to use.
- Turn that breaker off and confirm nothing else in the house goes dark.
- If other loads share the circuit, plan on a dedicated run.
A 15A circuit supports roughly 12 amps of continuous load under the 80% rule most electricians apply. A 20A circuit supports roughly 16 amps.
Grounding and Outdoor-Rated Connections
Grounding gives stray current a safe path back to the panel instead of through a person. Every modern receptacle has a third prong for exactly this reason, and a three-to-two prong adapter defeats the purpose. If your outlet is two-prong, have an electrician bring it up to date.
Outdoor installations add two more requirements:
- Weather-resistant (WR) receptacles. Standard receptacles corrode in damp air. WR-rated ones are built for it.
- In-use (bubble) covers. These keep the receptacle protected while a cord is plugged in, which a flat cover cannot do.
Cord Protection and Drip Loops
A drip loop is a simple U-shaped bend in the cord just before it reaches the outlet. Water running down the cord hits the bottom of the loop and drips off instead of tracking into the receptacle. Keep cords out of walkways, off wet floors, and away from the tub's splash zone. Never run a cord under a mat, through a doorway, or across a path where it can be pinched or tripped over.
When to Call a Licensed Electrician
Call one if any of the following is true:
- The outlet is not GFCI-protected and you cannot add protection at the receptacle.
- The chiller needs a dedicated circuit and the panel has no open slots.
- The outlet is two-prong, ungrounded, or shows signs of heat damage.
A licensed electrician can confirm circuit capacity, add GFCI protection, and pull any permit your local code requires, usually in a single visit.
The U.S. Consumer Product Safety Commission guidance on GFCI protection explains why GFCI outlets matter in wet areas. Always follow local electrical codes and the chiller maker's instructions, requirements vary by jurisdiction and by unit.
Cold Plunge Plumbing Requirements: Filling, Draining, and Hose Routing
Cold plunge plumbing requirements are simpler than they sound. Most home units need no plumbing at all.
Route two hoses between the tub and chiller: an intake hose and an outtake hose. Keep them short, untwisted, and free of kinks.
Plan these water details:
- Water supply: A nearby spigot or hose bib for filling.
- Drainage: A floor drain, a nearby yard, or a hose run to a sink or drain.
- Hose routing: Keep lines off the floor where people walk.
The Drift model ships with two water hoses and a filter, so setup stays tool-free. The 248-Gallon Inflatable Cold Plunge ships with two water pipes and two water taps.
Indoor Cold Plunge Installation: Moisture, Ventilation, and Condensation
Indoor cold plunge installation adds jobs outdoor setups skip: managing moisture, calculating floor load, and planning for water where water was never meant to go.
Calculating Floor Load Before You Fill
A filled tub is heavy, and the load concentrates on a small footprint. The Modtub 2.0, for example, weighs about 850 lb when filled. Here is how to estimate total filled weight:
- Water weight. Water weighs about 8.34 lb per gallon (A Million Gallons of Water - How much is it?). A 100-gallon tub holds roughly 834 lb of water alone.
- Tub and equipment weight. Add the empty tub, chiller, and any accessories. The Modtub 2.0's 850 lb filled figure already includes this.
- User weight. Add the heaviest person who will use it, typically 150 to 250 lb.
- Divide by footprint. A tub with a 4-square-foot base carrying 1,000 lb puts about 250 lb per square foot on the floor.
That last number is the one that matters. Residential floors are commonly designed for around 40 lb per square foot of live load in living areas, and a concentrated tub load can exceed that easily, especially on an upper floor or raised deck.
Modtub 2.0 Cold Plunge System →
When to call a structural professional:
- Any upper-floor installation above a finished space
- Any raised deck, balcony, or cantilevered floor
- Any installation over a crawl space or basement with visible sagging or cracks
A structural engineer or qualified contractor can assess the framing and, if needed, specify reinforcement.
Condensation: Why It Happens and Where It Goes
A cold tub in a warm room pulls moisture out of the air: warm air holds more water vapor than cold air, so when air touches the tub's cold exterior it cools below its dew point and releases that vapor as liquid water. The result is condensation on the tub walls, the chiller, the hoses, and often the floor.
Ventilation and Dehumidification
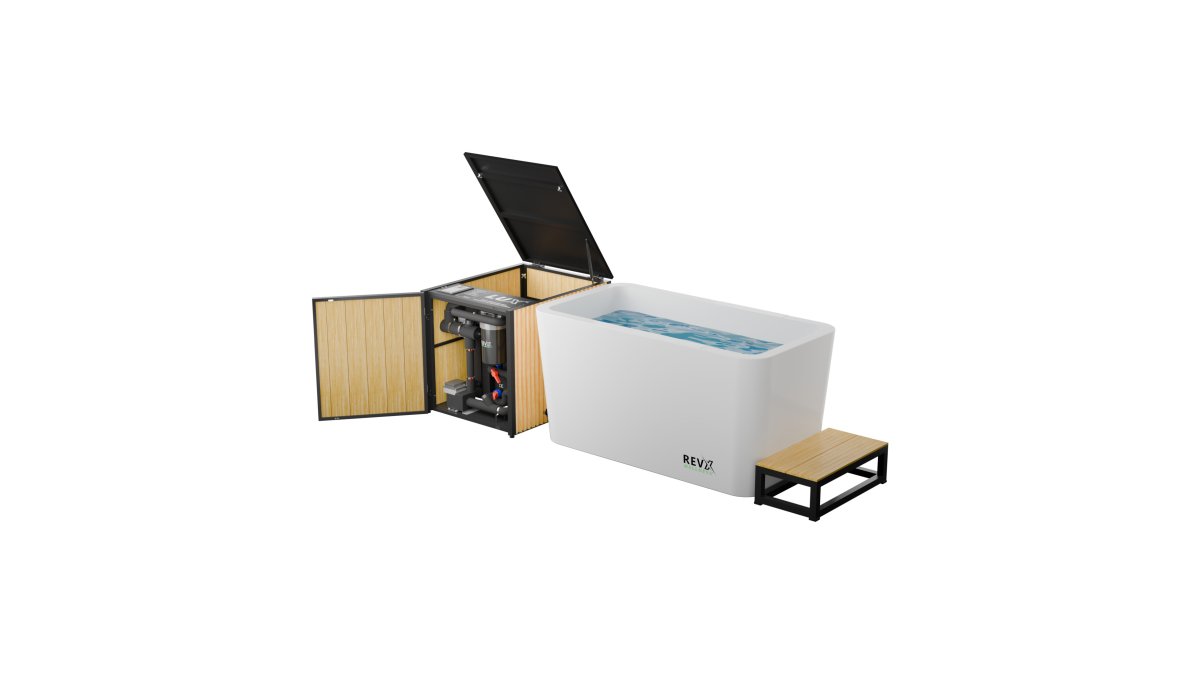
Airflow fixes most of it. The RevX LUX cabinet, for instance, keeps its chiller and filtration as separate units, which makes service access easier and keeps airflow paths clear.
Control moisture with these steps:
- Run a dehumidifier sized for the room during and after sessions. A unit rated for the room's square footage is the starting point; a damp basement may need more capacity.
- Open a window or run exhaust ventilation when outdoor humidity is low.
- Keep the chiller at least a few inches from walls on all sides.
The Modtub 2.0 includes an insulated lid, which cuts both evaporation and chiller run time.
Ventilation also protects the chiller. A unit boxed into a closet runs hotter and works harder, and the heat it sheds has nowhere to go.
Drainage, Overflow, and Water-Damage Prevention
Indoor installs need a plan for water that leaves the tub, through splashes, drips, hose connections, or an accidental overflow. Concrete floors with a floor drain are the easiest case. Carpet and hardwood are the hardest.
Plan for these water paths:
- Fill and drain access. Know where the water goes when you fill and when you drain. A floor drain, utility sink, or hose run to a drain keeps water off the floor.
- Spill containment. A waterproof mat or shallow tray under the tub and chiller catches drips and small spills. Look for one with a raised lip.
- Hose routing. Keep intake and outtake hoses off walking paths and above the floor where possible. A drip loop in the hose routing sends condensation to a catch point instead of the floor.
Room Layout and Service Access
Leave space beside the chiller so you can reach the filter and hoses without moving the tub. Plan for the tub's full length plus the chiller's footprint plus a few inches of clearance on every side.
Cold Plunge Setup Checklist: From Delivery to First Session
Use this checklist on delivery day. It follows the order that keeps you out of trouble.
| Step | Task | Time | Why It Matters |
|---|---|---|---|
| 1 | Confirm delivery access | 10 min | Tub and chiller must fit through doors and turns |
| 2 | Level and prep the surface | 15 min | Prevents stress on the chiller and tub |
| 3 | Position tub and chiller | 10 min | Leaves room for airflow and service |
| 4 | Connect intake and outtake hoses | 10 min | Keeps water circulating correctly |
| 5 | Plug into a GFCI outlet | 5 min | Adds shock protection near water |
| 6 | Fill with water | 15 min | Brings the system to operating level |
| 7 | Run a leak check | 30 min | Catches drips before they spread |
| 8 | Set temperature and run | 1-2 hrs | Confirms the cooling system works |
The Modtub 2.0 sets up in about 10 minutes with no plumbing and no tools. Inflatable models like the Drift and the 248-Gallon tub inflate in about two minutes with the pump supplied.
Before your first session, confirm the water is at your target temperature and the area around the tub is dry.
Cold Plunge Installation Costs, Maintenance Access, and Chiller Care
Cold plunge installation costs depend on what your space already has. If you have a grounded GFCI outlet and a level floor, most of the work is done; an electrician or a new circuit adds a step. Plan for service access from day one, leave space beside the chiller so you can reach the filter and hoses without moving the tub. Maintenance basics:
- Rinse or replace the filter on the schedule the maker gives you.
- Check water treatment, such as the ozone system and filter on the Drift or the UV lamp on the 248-Gallon tub.
- Keep the chiller vents clear of dust and debris.
The RevX LUX system uses a separate 20-micron filtration and sanitation setup, which keeps filter service away from the chiller itself.
U.S. Department of Energy guidance on home electrical safety
*This product is intended for general wellness and relaxation.
Setting up a cold plunge is a planning problem, not a construction project.
At Stack For Wellness, we build curated recovery systems so your equipment fits together and fits your space.
Frequently Asked Questions
What are the basic home cold plunge installation requirements?
Home cold plunge installation requirements are a level, load-bearing surface, a grounded outlet with GFCI protection, a plan for filling and draining water, and clearance around the chiller for airflow. Most home units need no plumbing. You fill with a hose, connect the intake and outtake hoses, and plug in the chiller.
Do I need an electrician to install a cold plunge?
Not always. Some units, like the Drift Inflatable Cold Plunge, run on a standard 100-120V household outlet with no electrician needed. Others, like the RevX LUX system, draw up to 11 amps and the maker recommends a dedicated 15A circuit. If you are unsure about your circuit or GFCI protection, have a licensed electrician check it.
Can I install a cold plunge indoors?
Yes. Indoor cold plunge installation works well in a garage, spare room, or basement with a solid floor. The extra job indoors is moisture control. Run a dehumidifier, keep the chiller a few inches from walls, and use a lid to limit evaporation between sessions.
How much space do I need around the chiller?
Leave open space on all sides of the chiller so it can move air. A unit boxed into a closet runs hotter and works harder. Plan room for service access too, so you can reach the filter and hoses without moving the tub. For the Modtub 2.0, allow about 75 inches of length for the tub plus the chiller beside it.
How long does cold plunge setup take?
Assembly is quick. The Modtub 2.0 sets up in about 10 minutes with no plumbing and no tools. Inflatable models inflate in about two minutes with the pump supplied. Add time for filling, a leak check, and letting the chiller reach your target temperature before your first session.
Frequently Asked Questions
What electrical requirements does a home cold plunge have?
Most home cold plunge chillers run on standard household power. The Drift Inflatable Cold Plunge uses 100-120V at 60Hz and needs no electrician. The RevX X Tub runs on 110V and draws at most 11 amps, and RevX recommends a dedicated 15A circuit. Whatever unit you choose, plug into a grounded outlet protected by GFCI, keep cords out of splash range, and check the listed draw before you commit to a shared circuit.
What plumbing is needed for a cold plunge?
Self-contained chillers need no plumbing at all. You fill the tub with a garden hose, and the chiller circulates water through an intake hose and an outtake hose connected at the tub. Draining means running a hose to a drain, a utility sink, or outdoors where water will not pool against the foundation. Only permanently plumbed acrylic tubs require a dedicated water line and drain, which is a different scope of work.
How much space do you need to install a home cold plunge?
Plan for the tub footprint plus the chiller beside it, plus clearance for airflow and service access. The Modtub 2.0 needs roughly 75 inches of length for the tub and chiller together, and it weighs about 850 lb when filled. The Drift tub measures 53 by 31.5 inches, and the 248-gallon tub measures 59.1 by 29.5 inches. Leave room to walk around the chiller for filter changes and hose checks.
Can you install a cold plunge indoors?
Yes, provided you plan for moisture. Inflatable and rotomoulded tubs like the Drift and the Modtub 2.0 are freestanding and rated for indoor or outdoor use. Indoors, put the tub on a waterproof surface, keep the chiller where air can move around it, and manage humidity with ventilation or a dehumidifier. A garage, basement, or spare room works well when the floor can carry the filled weight and the outlet is GFCI protected.


